I made an XR prototype with Figma and Bezel
Context
In my previous project, I did a design exploration of how a Spotify Karaoke experience would look like on Apple Vision Pro. However, that was designed purely on Figma, which is 2 dimensional and flat in nature instead of being 3D.
I ventured to find tools to really prototype an extended reality (XR) experience and the main tool I found was Bezel. For all intents and purposes, it is trying to be the Figma of XR prototyping. It has features such as realtime collaboration, interactions and even basic 3D modelling.
What I made
I managed to translate the key interactions of the Figma prototype into Bezel. This includes switching from the normal to immersive mode, transporting the user from their own environment to an actual karaoke room. It also includes adding your friends to join you in singing together over a video call.
These interactions were also tested on a Quest 2 headset, as seen in the video above. As the Quest 2 passthrough mode is captured in black and white, it is replaced by a pitch black background instead of footage of your actual surroundings.
Feel free to play with the prototype here.
How I did it
This prototype was made using Bezel and Figma, in fact there are some standard workflows as to how you use both of those tools.
General Workflow
The main workflow you will use most of the time is importing frames from Figma and making them interactive in Bezel. This is a 3 step process.
1. Copy paste a tracer

There is a basic but also easy to use Figma integration for Bezel. Essentially you copy the link of the frame on Figma and you paste it in Bezel. However, it pastes it as a flat, rasterised image instead of a vector. Therefore, depending on the size of the frame, it can look more pixelated. It also means the frame is flat and the multiple layers cannot be accessed directly.
Therefore, the tracing analogy is used. You paste the entire frame first, and then pick and choose specific layers such as a button to paste separately on top. Then, you can make the button interactive.
2. Layer what you want to be interactive on top
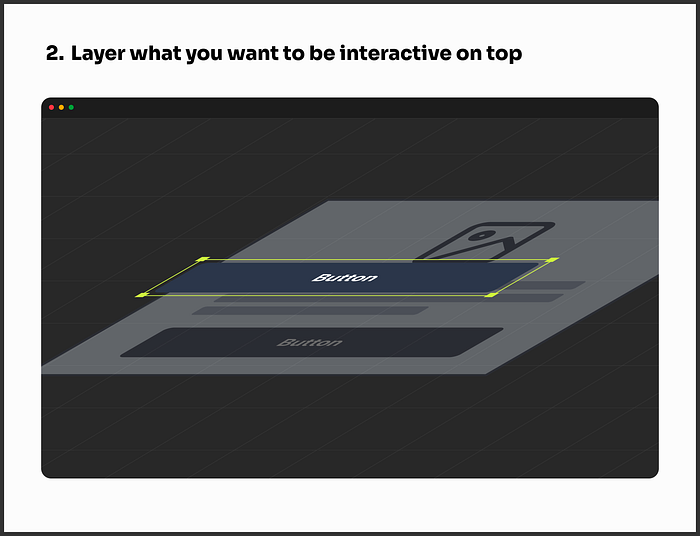
As mentioned before, for specific layers you would have to paste them separately on top. You follow the bottom layer to position that button accordingly.
3. Add interactions
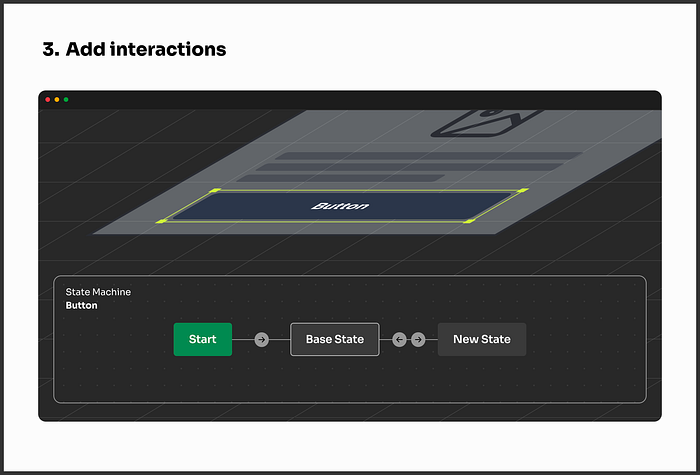
Subsequently you can select the layer to add interactions. Interactions on Bezel are represented by states. A layer starting in position A could be one state and the same layer moved to position B could be another. Therefore, Bezel has a state machine to manage each layer’s different states. You can even choose what triggers a transition between those states. Lets take an example of a pressing a button and causing a modal to appear. The trigger and states are as follows:
- Trigger: clicking the button
- Base state: Modal is 0% opacity and cannot be seen
- New state: Modal is 100% opacity and can be seen
Specific workflow

A more specific workflow is how to transport the user into a virtual world. The idea is create a sphere and apply a 360 degree image, called a “skybox”, onto it and make it face inwards. Subsequently, you would use the interactions to move the sphere into the camera’s view.
You can use google to find a variety of skybox images. However, if you want something more customised, there is an AI image generator called Blockade Labs that does just that. This is how I generated the inside of a karaoke room.
Critique of Bezel
As of September 2023, Bezel is still in beta and thus is not a mature product. Although the key functionality is there, there is always room for improvement and even things it does well.

First, I really like the idea of a state machine and how it is presented. This is a not a new concept by any means. However, it allows you to make minor changes to the object you’re editing and save it as a new state within the object. This is different from how Figma does it where you have to make a new screen and connect it with a “noodle”. The state machine just feels neater.
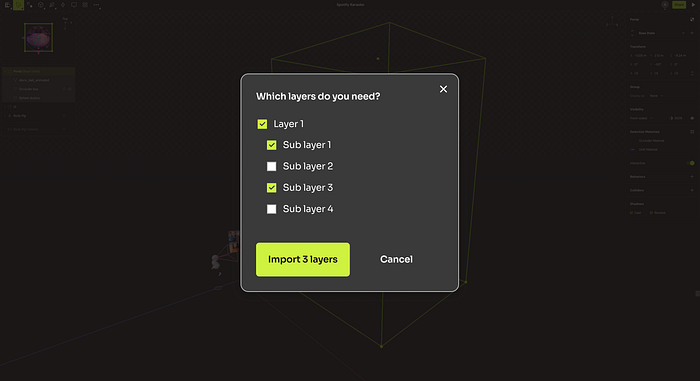
As explained earlier, the layering workflow requires multiple steps. This makes it rather cumbersome. It would be great if the first time you paste the entire frame inside, it also includes the individual layers so you can manipulate it. However, adding unnecessary layers might make the prototype less optimised. Perhaps after pasting, Bezel could ask which sub layers to import. This ensures only the necessary layers are imported. This workflow is repeated many times and by adding this fix, it would make transitioning between Figma and Bezel more seamless.
Finally, it would be great if GIFs, Lottie and video files could be supported. This feature has been requested before and I’m confident it’s on their roadmap.
Learnings
Keeping the UI world-locked instead of head-locked
One important thing I learnt is to keep the UI fixed in space (world-locked) instead of following the user’s head movement (head-locked). This is because each time the user wants to select a button in a specific direction, they would move their heads in that direction. So if the user wants to select a toggle that is on the top, they would have a tendency to tilt their head up. If it follows the head movement, the toggle would shift up in view and may even exceed the user’s viewport. Not to mention that this is a recipe for motion sickness. Therefore it is a better choice to keep UI world-locked to keep things predictable. In fact, this principle is touched on by Apple.
What I would do differently next time
Things I would do differently fall into 2 categories, specifically XR prototyping and the concept itself.
On the XR prototyping front, there are a couple of changes. Firstly, the skybox is rendered in rather low resolution due to technical limitations. To work within that limitation, I would use a more basic skybox and fill it up with my own 3D assets. As my 3D modelling skills get better over time, I could make some of these assets to ensure they are low poly and not too taxing on the headset. Secondly, I would also set up the Apple Vision Pro emulator and test out the Bezel prototype as well since this experience is designed for the Vision Pro.
On the concept front, I would incorporate more karaoke elements as 3D assets. This would allow for richer interactions. Specifically, I would think about what interactions can we provide to the spectators who are not singing to enhance that fun factor. For example, in real life karaoke rooms there tends to be simple instruments like tambourines that could be brought into this experience.
Closing thoughts
In conclusion, Bezel is a great tool for XR prototyping. Without it, designers would have to find someone experienced in Unity just to prototype something. However when just designing the UI part of an XR experience, Figma is still your best bet. Bezel works best when it is treated as a prototyping tool but not an all in one design tool.
Over time, these tools will improve and we would be able to more effectively bring our ideas to life. We just need to continue keeping ourselves updated and embrace the future. Thanks for reading!
Kindly avoid distributing or saving content within this Medium article, at least without my permission. Thanks again for reading!

